Pages

Saturday, June 2, 2012

Sasha's Kitchen: Kobe Roast Beef Sandwich


I love kobe roast beef.  Its absolutely the best beef out there and the only kind of roast beef worth eating in a sandwich.  The best roast beef sandwich I've ever had is at a place in Park Slope called Bierkraft.  Bierkraft is a huge beer emporium, which also makes excellent sandwiches and has a fabulous selection of cheeses and charcuterie.  The kobe roast beef sandwich at Bierkraft, served with cheddar, tomato, arugula and horseradish mayonnaise is my absolute favorite.  It's always a treat to pick of their sandwiches for lunch.  I decided to recreate the bierkraft sandwich tradition in my own home for my husband and I with some Kobe style Wagyu roast beef from FreshDirect.  I bought a nice local Vermont cheddar, some fresh locally grown Jersey arugula, a tomato and whipped up my own horseradish mayonnaise.  I also threw in some cornichons which made the sandwich absolutely perfect.

Sasha's Kobe Roast Beef Sandwich (makes two)
1/2 lb Kobe Wagyu Roast Beef
Sliced cheddar cheese
handful of fresh arugula
sliced tomato
1/3 cup mayonnaise mixed with 2 tsp horseradish
cornichons

Spread horseradish mayo on both sides of foccacia roll and assemble sandwich as shown above. Yum - just like my favorite Bierkraft tradition.

Wednesday, May 30, 2012

Sasha's Kitchen: Strawberry Rhubarb Mini Pies


I made these delicious strawberry rhubarb mini pies a couple of weeks ago, just in the height of late spring strawberry and rhubarb season.  They're really a cross between a pie and a cupcake, and they were made in cupcake molds.  These were a delicious recipe from Martha Stewart's Pies & Tarts cookbook, which adds some orange zing to a traditional spring strawberry rhubarb pie.  They're just perfect in this bite size manifestation - just enough pie to savor the flavors of fresh strawberry season.  I love the combination of strawberry and rhubarb and I haven't been able to get enough of the two this spring, after making six jars of strawberry rhubarb jam.


Strawberry Rhubarb Mini Pies
(adapted from Martha Stewart)
Crust
3 cups all purpose flour
3 T granulated sugar
1 tsp salt
1/4 cup cold vegetable shortening
1 1/2 sticks of cold, unsalted butter cut into small pieces
1/2 cup plus 2 T ice water
2 large eggs for egg wash
fine sanding sugar for sprinkling

Filling
12 oz (about two cups) fresh strawberries, hulled and cut into a tiny dice
5 stalks rhubarb, trimmed and cut into a tiny dice
1 T finely grated orange zest
1/4 cup orange juice
1/2 tsp orange extract (instead of grand marnier, which the original recipe called for 1/4 cup)
1 cup granulated sugar (original recipe called for 1 1/2 cups)


First, make the crust.  Pulse the flour, sugar, salt, vegetable shortening and butter to a coarse meal in your stand mixer.  Add the ice water, one tablespoon at a time and pulse until dough just comes together.  Flatten into two discs and chill for one hour.


Combine the ingredients for the filling and allow to sit.  Preheat the oven to 350.  Take out two silicone muffin tin trays and line with paper muffin liners.  Roll out dough 1/4 inch thick and cut out 24 rounds using a 3 1/2 inch round cutter or the top of a glass.  Press the circles into the cups.  Reroll scraps and cut out four small straps for the top of each mini pie using a knife or pastry wheel cutter.  Refrigerate shells and straps until firm, about 30 minutes.


Strain the liquid from the fruit mixture and place about 2 T in each cup.  Top with woven lattice using the straps and pinch to seal.  Use the eggs to coat with an egg wash using a pastry brush and sprinkle on the sanding sugar.  Trim away any excess dough.  Chill for another 30 minutes or until firm.  Bake until golden brown at 350 for about 60-70 minutes.

Saturday, May 26, 2012

Sasha's Kitchen: White Chocolate Raspberry Cupcakes


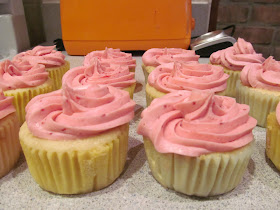
I made these cupcakes a couple weeks ago, using some homemade raspberry preserves that I canned myself last August in my very first home preserving project.  They were delicious and have been great in several desserts, including the raspberry swirl cheesecake I made over the winter.  I haven't made cupcakes in awhile, and these aren't creatively decorated like some of my desserts, but are light, delicate and summery.  The white chocolate is quite lovely with the raspberry buttercream.

Sasha's White Chocolate Raspberry Cupcakes
White Chocolate Cupcakes
1 1/2 cups flour
1 tsp baking powder
2 whole eggs
1 stick of butter (1/2 cup), softened
1/2 tsp salt
3/4  cup granulated sugar
5 oz melted white chocolate
1 tsp vanilla
1 cup milk

Raspberry Buttercream
1 1/2 sticks unsalted butter at room temperature
1/3 cup raspberry jam
4 cups confectioners' sugar


To make the cupcakes, combine the flour, salt and baking powder in a bowl and set aside.  Melt the white chocolate chips in a double boiler and stir until smooth.  In a stand mixer, fitted with the paddle attachment, cream the butter and sugar until light on medium high speed for about 3 minutes.  Beat in the eggs, adding one at a time.  Then beat in the white chocolate and vanilla.  With the stand mixer on low, alternate adding the flour and milk mixtures until incorporated.  Divide into cupcake molds that are lined and bake at 325 for about 20 minutes, until a toothpick comes out clean.

To make the buttercream, beat the butter until smooth.  Beat in the sugar and jam until smooth and a lovely shade of pink.  Pipe on the cupcakes (once cooled) using a pastry bag.

Wednesday, May 23, 2012

Sasha's Kitchen: Herbed Goat Cheese Salad with Strawberries


Goat cheese is one of my favorite foods, and I especially love it in a salad, when it is breaded and warm, the way they do it in good restaurants.  It's actually not that hard to achieve the same result at home by using the proper technique.  This salad, with a homemade basil dijon vinaigrette is enhanced by any seasonal fruit, but this time of year, it is great with fresh local strawberries, which can be arranged outside the perimeter of the salad for a pretty presentation.  This recipe serves four as an appetizer, or two as a dinner salad.


Sasha's Herbed Goat Cheese Salad
5 oz salad mesculin greens
sliced fresh strawberries
9 T canola oil
1 T dijon mustard
2 cloves garlic, diced
3 T red wine vinegar
1 T finely diced basil
4 oz herbed goat cheese, cut into four rounds (I used Vermont Butter & Cheese Creamery)
2 egg whites
1/3 cup panko bread crumbs


First, slice the goat cheese into four rounds.  Then, scramble the egg whites with a whisk and coat in the whites, then cover with the panko.  Recoat with the whites and cover with a second layer of panko.  Place on parchment paper (so it doesn't stick to the plate) and put in the freezer for half an hour.  Heat up canola oil in a frying pan and fry for about two minutes on each side over medium high heat.  Place on paper towel to absorb excess oil.  Serve while warm.  To make the dressing, whisk together the garlic, vinegar and dijon mustard.  Pour in oil and mix constantly into the vinegar base to emulsify.  Add the basil and mix well.  Add about 2/3 of the dressing to 5-6 oz of salad greens.  You can add a bit at a time to get the desired effect so you don't get a soggy over dressed salad.  Serve with sliced strawberries.

Sunday, May 20, 2012

Sasha's Kitchen: Rosewater Macarons with Raspberry White Chocolate Ganache


I'm a big fan of anything Parisian these days.  I've wanted to explore Parisian pastries for a long time, because they are so lovely, pretty and delicate and also delicious.  I had tried making macarons about a year and a half ago, but was not very pleased with the results.  Macarons are the darlings of the French pastry world - the new cupcake so to speak.  They can come in every flavor and color, and are light and delicate and oh so pretty.  All I strived for was a lovely little macaron like the ones we tasted at Pierre Herme's shop in Paris.  I finally decided I was up to the task again, that I could figure out the intricate and particular art of macaron making.  I bought a new book on macarons for my arsenal - Les Petits Macarons by Kathryn Gordon and Anne McBride.  The video on their website is also a terrific supportive primer to macaron making.  I strongly suggest purchasing this book!  I'll walk through the steps that I followed like I always do on this blog, but the book itself is a huge help (especially the troubleshooting section in the back) for a successful hands on macaron experience.  I have made two batches of macarons using this book.  The first was a rosewater macaron with a white chocolate raspberry ganache filling.  The second, which I will post about next week, was even better (because my technique improved with some practice), a chocolate macaron with an expresso-cinnamon-chocolate ganache.  Please note that for the rosewater macarons, I used a small amount of rosewater flavoring, rather than rose petals, as suggested by the book.  With macarons, it is essential to measure ingredients precisely - for this reason, I used, as recommended by Gordon's book, a digital kitchen scale to weigh out everything in grams.   The book has several methods for preparing macarons, French, Italian and Swiss.  I used the French macaron method.  This time, I basically have photos of the finished product, but for my next macaron post, I took numerous process photos to share as well.  Stay tuned!


Rosewater Macarons with White Chocolate Raspberry Ganache
165 grams almond flour
165 grams confectioner's sugar
pinch of fine sea salt
5 grams powdered egg whites
150 grams granulated sugar
115 grams aged egg whites (from approximately four eggs)
1/2 tsp cream of tartar
pink gel food color (a few drops)
1 tsp rosewater

Rose-Raspberry White Chocolate Ganache
11 ounces (320 grams) white chocolate, chopped
2 T corn syrup
3/4 cup sour cream
1/4 cup raspberry puree (from fresh raspberries)
1 T unsalted butter, soft
1 tsp rose compound
1 T framboise


To make the macarons, double stack two sets of baking sheets.  This allows the heat to distribute more evenly which is key.  Line with either silicon silpat mats (I bought mine at NY Cake and they are terrific) or with parchment paper.

Place the almond flour, confectioner's sugar and salt in the bowl of a food processor and pulse four times for three seconds.  Sift until well mixed.  Make the French meringue next but whisking the powdered egg whites with the granulated sugar in the bowl of a mixer with a whisk attachment.  Whisk in the egg whites and cream of tartar until the mixture is homogenous.  Set on medium to medium high speed and whisk about 10-11 minutes until the meringue is glossy and forms stiff peaks.  Add the rosewater extract and gel food color to the meringue.

Next up the famous macaronner step, a folding step with Gordon's book describes in more detail.  With a spatula fold in the sifted ingredients to the meringe using a J fold and continue folding for a total of about 8 strokes after it looks incorporated using the J fold macaronnner technique.  I can't really describe it here - its an art and you need the book!


Pipe one inch circles using a pastry bag and a half inch tip.  I made these a little big, something that I corrected with my next batch of macarons, so stay tuned.  Bake at 200 to dry for exactly 15 minutes, then raise the heat to 350 and continue for nine minutes.  Allow to cool before moving from the silicon.  My feet were a bit lopsided on these macarons because I didn't rotate the trays halfway through at the 350 temperature which is essential for even distribution of heat.  I improved this the second time around.

To make the ganache filling, bring the corn syrup, sour cream, and raspberry puree to boil in a small saucepan over medium high heat.  Pour over the chocolate in the food processor and wait a minute to let the chocolate melt completely.  Pulse until smooth, then add the butter and the rose compound, then the framboise and pulse until shiny.

Pour the ganache in a shallow pan and allow to cool to room temperature for about 15-20 minutes, stirring occasionally, until it is pipeable and not too runny.  Pipe and pair the macarons.

Thursday, May 17, 2012

Sasha's Kitchen: Swiss Chard Ravioli with Mascarpone & Ramps in Rose Sauce


Ah, my latest and greatest ravioli creation!  I just love coming up with new recipes for homemade ravioli that use seasonal ingredients.  This one was also a great success.  I wanted to incorporate swiss chard into the dough of the ravioli, rather than using spinach to make the ravioli green.  For the filling - I went all out into spring using ramps, mascarpone cheese and some lemon zest.  As usual, this made about six dozen ravioli so there were plenty for freezing for upcoming meals.  I served the ravioli with a bit of rose vodka sauce, which was the perfect match.

Sasha's Swiss Chard Ravioli with Mascarpone & Ramps
Ravioli dough
6 oz swiss chard leaves
3 1/2 cups of flour
5 large eggs

Filling
1 bunch of ramps, diced
1 500 gram container of mascarpone cheese
zest of one lemon

Rose Vodka Sauce
3 shallots, diced
3 cloves garlic, diced
1/2 cup vodka
1 1/2 cup heavy cream
1 24 oz can whole tomatoes, pureed
2 tsp thyme leaves


Prepare the ravioli dough in a stand mixer.  First, blanch the swiss chard leaves in boiling water.  Then squeeze every last drop of moisture from the leaves.  Blend the leaves with the eggs in the basin of your mixer.  Add the flour all at once and mix until you can form four balls of dough with your hands.  Wrap the dough with plastic wrap and allow to rest for about 30-45 minutes before rolling out into sheets to form the ravioli.  Mix the ingredients together for the filling.  Once pressed in a ravioli press, allow the ravioli to dry for an hour before freezing it in bags, or cooking it in boiling water.


To make the sauce, saute the shallots until soft and saute the garlic for an additional two minutes.  Add the vodka and allow the alcohol to burn off, which takes about two minutes on high.  Add the cream and tomatoes, and stir to form a sauce.  Season with salt, pepper and fresh thyme leaves and allow the sauce to thicken.

Tuesday, May 15, 2012

Sasha's Kitchen: Corned Beef and Cabbage


I was inspired to make Irish corned beef and cabbage, after our friend Keisha made delicious braised corned beef and cabbage for a St. Patrick's Day gathering.  I bought a corned beef brisket from Fresh Direct, which is pretty much the only place to find such things other than around St. Patrick's day.  The meat was excellent quality, as I have come to expect from just about everything at Fresh Direct.  It even came with a seasoning packet which I added to the brine (looks like it contained peppercorns, bay leaves, mustard seeds and possibly juniper).  The recipe is quite simple and the corned beef brisket has an excellent flavor.  The key to this recipe, other than getting a good cut of meat, is cooking it slowly, so that the meat falls apart. I don't use a show cooker, but I found that simmering for four hours was perfect.  I looked up some recipes online before adapting to come up with this one.

Sasha's Corned Beef & Cabbage
1 corned beef brisket of 3-4 lbs
1 cabbage, cut into pieces
1 1/2 cups baby carrots
2 onions, peeled and quartered
3 sprigs of thyme
small bunch of parsley
1 tsp mustard powder
add 15-20 peppercorns and 1 bay leaf if not using the Fresh Direct seasoning packet


Add all of the ingredients above except for the cabbage to a large stockpot or slow cooker.  Cover the brisket and vegetables by an inch or so of water.  Bring to a boil, then simmer for two hours.  Add the cabbage and simmer for another two hours, before straining most of the broth.  Remove the onions, thyme and parsley before serving on challah rolls, or if you can find it, irish soda bread.

Saturday, May 12, 2012

Sasha's Kitchen: Eclairs


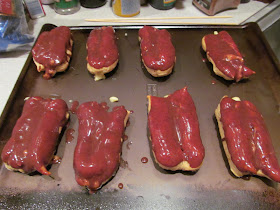
As I have said in some recent posts, I've been trying out a new French recipe each week.  Before moving on to delve deep into the world of macarons, I decided to try making eclairs, once the darling of the French patisserie, before macarons came on the scene. The key to making delicious eclairs in making pate choux, the basis of the French cream puff, piping out the pate choux, and allowing it to puff up into eclairs in the oven.  Then, the pastries are filled with homemade pastry cream and glazed in a chocolate ganache glaze.  These only stay good for about a day, and are really best if you eat them right away, so I suggest making them for a party, perhaps for a French brunch.  I was really happy with how these came out - they were nice and puffy and filled up easily with the pastry cream.

Eclairs (recipe from Martha Stewart)
Pate Choux
1 stick of butter, cut into pieces
1 tsp sugar
1 1/4 cup flour
four large eggs

Pastry Cream
six egg yolks
1 large egg
3/4 cup plus 2 T sugar
3 T cornstarch
3 T flour
3 cups milk
3 T unsalted butter
2 tsp vanilla extract

Glaze
1/2 cup heavy cream
4 oz semisweet chocolate chips


First, to make the pate choux, bring butter, sugar, salt and one cup of water to boil in a medium saucepan.  Remove from heat and quickly stir in the flour.  Continue stirring constantly over medium high heat until mixture pulls away from the sides and a thin film forms on the bottom, about three minutes. Transfer to the bowl of a stand mixer, fitted with the paddle attachment.  Mix on low speed for a minute, then turn to high speed and add the whole eggs, one at a time.  Beat on high until soft peaks form when you touch with the tip of your finger

Preheat the oven to 425.  Line two baking sheets with parchment paper or use silpats.  Fill a pastry bag with a 1 inch tip and pipe oblong shapes onto the baking sheets at 2 inch intervals.  Run a wet fork along the top of each to ensure even rising.

Cover one sheet with oiled plastic wrap and put in the fridge, until the first sheet is done.  Bake 10 minutes at 425, then reduce to 350 and bake another 25 minutes.  Turn off oven and prop door with a spoon and allow to cool in the oven for ten minutes.  Transfer to a wire rack to cool and bake the second sheet the same way.

The pastry cream can be made ahead of time.  Prepare an ice bath.  In a medium bowl, combine the yolks and 2 tablespoons of sugar.  Whisk in the cornstarch and flour and whisk until smooth.  Set aside.  In a medium saucepan, combine the milk and remaining sugar.  Stir over medium heat until milk begins to steam.  Then. whisk in the egg mixture, stir until smooth and return to the heat.  Bring the mixture to a boil and stir constantly to prevent scorching until it forms a thick custard.  Strain and place over icebath.  Chill.


Fill the eclairs with the pastry cream using a pastry tip.  To make the glaze, heat the cream in a saucepan, and pour the hot cream over the chocolate.  Let stand until melted and whisk until smooth.  Dip each eclair in the chocolate cream.  Allow glaze to set.

Wednesday, May 9, 2012

Sasha's Kitchen: Dan Dan Noodles


These Sichuan style noodles were a pleasant addition to my weekly menu a couple weeks ago.  The recipe made plenty of noodles, and they were quite flavorful.  My husband and I adapted the recipe to use ground beef rather than pork, and added some Sriracha sauce for a bit of heat.  This was quite easy to make using udon noodles.  It's probably not an ethnic Chinese dish the way it was made, but it certainly has the flavors and inspiration of Sichuan cuisine behind it.

Dan Dan Noodles (adapted from Serious Eats)
12 oz Shanghai style noodles or udon
2 T canola oil
1 lb ground beef
2 T chopped fresh ginger
3/4 cup low sodium chicken stock
Sriracha, to taste
2 T red wine vinegar
2 T soy sauce
4 tsp tahini
1 tsp Sichuan peppercorns, ground
pinch of sugar
4 T chopped peanuts
1 bunch of scallions, thinly sliced


Bring a large pot of water to boil and add the noodles.  Cook until tender, drain and set aside. In a large 12 inch skillet or wok, heat oil over medium heat until smoking.  Add beef and a pinch of salt and pepper and cook until partially cooked but still half pink.  Add ginger and continue cooking until beef is cooked through.  Stir in the chicken stock, siriracha sauce, red wine vinegar, soy sauce, tahini and peppercorns.  Season with a little sugar and boil and simmer about 7-10 minutes until the sauce thickens. Add the noodles to the skillet and toss well in the sauce.  Serve with peanuts and scallions.

Saturday, May 5, 2012

Sasha's Kitchen: Boeuf Bourguignon


I've been on a bit of a French cooking kick lately.  It all started when I took my most recent cooking class, the Essentials of Burgundian Cooking at the Institute of Culinary Education (ICE) in Manhattan.  Since then, I've made several French dishes (some in the class and some not) including my first try at eclairs which I will be posting soon (they were great!).  I've made boeuf bourguignon in the past, but I've never been happy with the results.  I always left out the caramelized pearl onions in the past, which was a big mistake.  This new recipe, from my French cooking class, is a bit more simplified that some that I have tried in the past, but in a classic kind of simplicity that made the perfect French stew.  This was one of the best meat-based dishes I've ever made, and it had a lovely perfect simplicity to it that was just perfect.  As my husband put it, it was like being back in Paris.  This dish is another one that will be on the list for upcoming dinner parties.  I should note, I substituted regular slab bacon with turkey bacon since I don't eat bacon at home, and made some other minor modifications to the recipe in the class, reflected below.  The meat was amazingly tender and the sauce was stunning and delicious.


Boeuf Bourguignon
8 oz turkey bacon, cut into 1/2 inch pieces (original recipe calls for slab bacon)
2 1/2 lbs beef cubes
6 to 8 T butter (approximate)
2 oz tomato paste
1/3 cup flour
2 cloves crushed garlic
2  bottles burgundy red wine
1 cheesecloth sachet with 12 peppercorns, 2 bay leaves and 5 stems parsley
salt and pepper to taste
1 lb mushrooms, quartered
1 bag pearl onions
1 T minced parsley
2 T sugar
chicken stock, as needed

Cut the turkey bacon and cook in a dutch oven.  You are supposed to reserve the fat, but turkey bacon really doesn't have any.  After the turkey bacon is cooked, set it aside.  Add 2 T butter and brown the beef until it caramelizes nicely.  Remove the beef from the dutch oven and add the flour to about 4 T of butter.  Make a blond roux by cooking the flour and fat over medium heat.  Then add the tomato p[ate and cook for a few minutes until the paste roux mixture darkens and caramelizes.   Add the crushed garlic and cook a few more minutes, then whisk in the wine.  Add back the beef and the sachet of spices.  Bring to a boil, then reduce the heat and simmer the beef until tender, about two and a half hours, covered on the stovetop.

While the meat is cooking, cook the mushrooms in 2 T of butter or canola oil.  I used canola oil, as I felt this dish had already used enough butter.  I normally don't use butter and substitute canola oil when cooking but this dish really requires butter for the roux.  Its ok to cook the mushrooms in canola oil though, and I did.  Saute the mushrooms for about ten minutes until nicely browned, and set aside.


To prepare the glazed onions, fill a medium saucepan with water and bring to a boil.  Add the onions and blanch for one minute.  Then shock the onions in an ice bath.  Peel off the skins.  Place the onions back in  the saucepan with 2 T sugar and 1 T butter and enough chicken stock to cover the onions.  Bring liquid to a boil and let the liquid evaporate.  Set the onions aside for serving.

When the beef is about tender, remove any fat from the surface of the braising liquid  and boil the liquid a bit for a few minutes to thicken to the desired consistency - it didn't take much.  Also discard the sachet.

When the liquid has reached the proper consistency, add the mushrooms and turkey bacon.  Season as needed with salt and pepper, and serve sprinkled with the glazed onions and minced parsley.

Wednesday, May 2, 2012

Sasha's Kitchen: Goat Cheese Pita Pizzas


I made this nice quick meal last week when I didn't have much time to cook.  I made four of them, but my husband and I had leftovers as they were more filling than you might think.  This is an adaptation from the halloumi Greek pizzettes that I had made in the past, which were delicious.  These are a nice treat that is of course much healthier than conventional pizza!  I just love arugula on pizza and this is no exception.

Sasha's Pita Pizzas 
8 oz goat cheese, crumbled
four pocketless pitas
1 pint yellow grape or cherry tomatoes
2 cups baby arugula
1 T lemon juice
1 T olive oil, plus more for tasting pita
1/3 to 1/3 cup apricot jam

Preheat your oven to 350.  Brush the pita with olive oil on both sides using a pastry brush and toast for ten minutes.  Spread on the apricot jam.  Top with crumbled goat cheese and grape tomatoes (after halving the tomatoes) and bake for about five minutes.  In the meantime, mix the arugula with the olive oil and lemon juice.  Take pizzas out of the oven and top with the arugula mixture.  Serve immediately.

Sunday, April 29, 2012

Sasha's Kitchen: Chocolate Cake with Raspberry Coulis


Recently, I took a French cooking class, the essentials of burgundian cooking at the Institute of Culinary Education (ICE) in Manhattan.  The class was a fun class where we broke into groups and made an entire French meal.  I perfected my boeuf bourguignon skills, which I will be making at home again this weekend.  The dessert for the class was this delicious French style chocolate cake, Gauteau ay Chocolate avec Framboise Coulis, which I made again at home, and it was even better.  My husband was a huge fan of this classic French dessert which is perfect for any dinner party.

Chocolate Cake with Raspberry Coulis
Cake
6 oz semi sweet chocolate
1 1/2 sticks butter, cut into 1 T pieces
4 eggs, separated
3/4 cup sugar
3 T pureed almonds, or almond flour
4 T flour
pinch of cream of tartar
pinch of salt

Glaze (I made a half recipe of the laze at home because I thought that was enough)
6 oz semisweet chocolate
4 T coffee
6 T butter

Rasberry Coulis
1 pint fresh raspberries
1 T lemon juice
1 T Framboise
powdered sugar to taste (I like the sauce to be tart, so I only used 2 T)


Spray an eight inch cake pan with pam and line with parchment paper, sprayed with pam.  Preheat the oven to 350.

Melt the chocolate and butter for the cake batter in a double boiler.  In an electric mixer with a whisk attachment, beat the yolks with 1/4 cup of the sugar until the mixture forms ribbons that fall from the mixer.  This takes about four minutes at a high speed.  Add the chocolate mixture and blend together.  Add the flour and almond flour and combine.  Remove and clean the mixer and set aside.

In the mixer with a whisk attachment in a separate bowl, beat the egg whites, cream of tartar and salt until it forms a soft peak, on high speed.  Slowly add the remaining 1/4 cup of sugar and beat on high speed until stiff peaks form.  Fold the beaten whites into the chocolate batter with a spatula.  Pour into prepared cake pan.  Bake for 30 minutes or ubtil cake pulls away from sides of pan.

Allow the cake to cool for 10 minutes.  Invert and remove from pan and take off the parchment paper liner.  Cool completely before glazing.


To make the glaze, heat the chocolate and coffee over a double boiler.  Off heat add the butter and stir gently to combine.  Pour on cooled cake.

Blend the ingredients for the coulis in your blender.  Serve with cake.

Thursday, April 26, 2012

Sasha's Kitchen: Strawberry Rhubarb Jam & Challah French Toast


I made this delicious jam and preserved six jars using the boiling water method.  This was my first jam of the season and was a huge success for my second time making jam overall.  I just love the combination of strawberry and rhubarb this time of year, so I couldn't resist making some strawberry rhubarb jam.  Yum! My jam cam out perfectly using the Pomona's Universal Pectin recipe on their website and the instructions for preserving in Sherri Brooks Vinton's book Put Em up.  I took her class on preserving last year at the Brooklyn Kitchen. My jam had a little bit of fruit float, which isn't a big deal but a place to improve.  To correct for that, I should crush the fruit a little better next time, which may mean using a potato masher instead of my own hands!  At any rate, I have enjoyed using this delicious jam, both jazzing up some goat cheese on crackers as an appetizer and with challah french toast.  It's the best jam to start the canning season!  Please note, I multiplied the original recipe by 1.5 to make six conventional sized jam jars rather than four. Also, the recipe from Pomona's gives a sugar range, so what I used is below.

Strawberry Rhubarb Jam
3 cups rhubarb, cooked and crushed
3 cups crushed strawberries
1 1/3 cups of sugar
3 T lemon juice
3 tsp calcium water
3 1/4 tsp pectin


Combine the sugar and the pectin in a small bowl and set aside.  Heat the jars (minus the lids) in a large pot covered with two inches of water.  They just have to be hot, not reaching a boil.  You are not truing to sterilize at this point. Add some rhubarb (cut up) to a little water an cook until soft.  Then (after cooking!) measure three cups of rhubarb.  Mash two pints of strawberries using your hands or a potato masher and then measure three cups of the mashed strawberries.  Transfer the fruit to a large, reactive saucepan and slowly bring to a boil over low heat, stirring frequently.  Stir in the calcium water and lemon juice.  Then slowly add the sugar-pectin mixture.  Slowly return to a boil and heat to ensure the mixture is heated thoroughly.  Then turn off heat and allow to rest for five minutes.  Skim off any foam.

Using the boiling water method of preserving, ladle into half pint jars that have been prepared, leaving a quarter inch of headspace.  Release any trapped air and lightly place caps on jars.  Process for 10 minutes (once the water reaches a hard boil, set timer for 10 minutes).  Allow to stay in water for five minutes before removing.  Then allow to cool at room temperature.  Will stay good for one year!

To make the french toast, follow the recipe below.  This jam is amazing on the french toast.


Sasha's Challah French Toast
1 small-ish Challah
5 eggs
1 1/4 cup skim milk
1/2 tsp vanilla
1/2 tsp cinnamon
butter or canola oil for cooking

Whisk together the eggs, milk cinnamon and vanilla.  Slice the challah into thick slices.  Heat a large pan with either butter or canola oil.  Quickly dip the challah to soak up the batter, and then cook in the pan until nicely browned.  Serve immediately with strawberry rhubarb jam.


Tuesday, April 24, 2012

Sasha's Kitchen: Cod with Slaw, Salsa Verde and Plaintains


Palo Santo is one of Park's Slope's delicious restaurants that my husband and I always enjoy going to.  I adapted this delicious and healthy fish restaurant from the New Brooklyn Cookbook, where the recipe hails from Palo Santo.  I wasn't able to get bluefish, so I adapted the recipe for cod.  It was still delicious and I really loved the salsa verde, plantains and slaw with the fish.  This take a bit of time to make, but not as long as you would think.  The end result is a beautiful, colorful and healthy display - a perfect meal for cheering up on a gloomy day!

Cod with Slaw, Salsa Verde and Plantains
Slaw
1/2 head small red cabbage, cored and shredded
1 scotch bonnet pepper, seeded and minced
1 garlic clove, minced
1 T red wine vinegar
2 T extra virgin olive oil
salt and pepper to taste

Salsa Verde
10 oz green tomatillos, husked and rinsed
1/3 cup minced chives
1 cup minced cilantro (original recipe called for two but I used less)
juice of one lime
1 T extra virgin olive oil
salt to taste

Plantains
3 very ripe plantains (I used two)
1 T melted butter

Fish
two 8 oz cod fillets (original recipe called for 6 8oz bluefish fillets)
1/4 cup canola oil
salt and pepper

Preheat the oven to 425.  To make the slaw, combine the cabbage, pepper, garlic and vinegar and olive oil in a large mixing bowl.  Season with salt and pepper and set aside to marinate.

To make the salsa, use a paring knife to make an X on the bottom of each tomatillo.  Blanch in boiling water for a few seconds until the skin starts to split and then plunge into an ice bath.  Peel, discard skins and seeds and chop the tomatillo.  Combine with the other ingredients above for the salsa verde and set aside.

Roast the plantains on a rimmed baking sheet at 425 for about 20 minutes until they begin to puff and burst.  Then cut them and coat with the melted butter.  Bake until golden brown, another 5-10 minutes.

To prepare the fish, season with salt and pepper.  Prepare an ovenproof saute pan and add the canola oil  and heat.  Cook 2-3 minutes, and then place fish in oven to finish cooking about five minutes until it is opaque in the center.

Saturday, April 21, 2012

Sasha's Kitchen: Rhubarb Crumble Pie


I love strawberry rhubarb pie.  Its my favorite.  I just love the tang of the rhubarb combined with the sweet strawberries.  Yum!  But I decided to go a bit tangier this time and try out a Martha Stewart recipe for a rhubarb crumble pie.  And you know what - it was amazing too! A bit tangier than the combined pie but just plain delicious and a perfect wait to start pie season while waiting for fresh farmer's market strawberries.  I'm going to do the strawberry rhubarb version soon, but just rhubarb was just perfect too!  This weekend, I plan on making some strawberry rhubarb jam for my first canning of the season.

Rhubarb Crumble Pie (from Martha Stewart's Pies and Tarts)
Bottom Crust
1 1/4 cup flour
1 stick cold butter, cut into small pieces
1 tsp sugar
1 tsp salt
approximately 1/8 cup ice water

Filling
1 3/4 lbs rhubarb, ends trimmed and cut crosswise (about 6 cups)
1 cup sugar
pinch of salt
2 T cornstarch

Crumble Topping
3/4 cup flour
1/3 cup packed light brown sugar
3 T granulated sugar
pinch salt
6 T cold unsalted butter, cut into small pieces


To make the bottom crust dough, follow the instructions for my apple pie dough.  You can also make it in a stand mixer, but don't overknead.  I made it in my stand mixer this time.  Stop mixing just when the dough comes together.  Chill for about 45 minutes wrapped in plastic wrap.  You are making a half recipe of dough because you are not making a top crust.

On a floured surface, roll out the dough and fit into a 9 inch pie plate, leaving a one inch overhang.  Fold overhang and press gently to seal.  Crimp edges as desired and chill for about 30 minutes.

Preheat the oven to 375 and in a large bowl, toss rhubarb, sugar, cornstarch and a pinch of salt. Pour into the pie shell.

Mix the crumble topping with your fingers until combined and large clumps form.  Sprinkle on top of pie and bake the pie until the topping is browned and the crust is lightly browned, about an hour and a half.  You can cover with foil if it browns too fast.  Allow pie to cool before serving.

Saturday, April 14, 2012

Sasha's Kitchen: Bucatini with Cauliflower and Ramps


I'm really into making pasta dishes with spring vegetables right now.  I love using everyuthing that's seasonal.  I'm happy to say that I scored the first rhubarb of the season at Union Market in Park Slope and am making a rhubarb crumble pie this weekend (posting it soon!).  In the meantime, I've been enjoying making some vegetable pastas.  Ramps finally arrived at FreshDirect just before Passover so I made this delicious dish just before passover started.  Ramps, if you are not familiar with them, are wild onions, usually gathered by hand.  They are a bit of a cross between leeks and wild garlic.  I like using them in pasta dishes during their short season.  Some people also like to make pickled ramps, but I haven't tried that yet.  Next week, I'll be making swiss chard ravioli dough with ramps/ricotta/marscarpone cheese and a rose vodka sauce.  Here's the first garden fresh pasta of the spring.

Sasha's Bucatini with Cauliflower and Ramps
1 lb bucatini pasta
florets from one cauliflower head, diced into small pieces
1 bunch of ramps, diced
zest of half a lemon
extra virgin olive oil
1 pint halved yellow grape tomatoes
1/3 cup panko bread crumbs

To make this dish, first saute the cauliflower in a couple tablespoons of extra virgin olive oil, for about ten minutes, until soft.  Add the lemon zest and the ramp bulbs (separated from the green part of the ramps) and cook antoher two minutes.  Then add the diced green part of the ramps and the yellow tomatoes and saute another few minutes until the tomatoes are softened and shriveled.  In the meantime, cook the bucatini (hollow tubular pasta) according to the package instructions.  Toss the panko bread crumbs in with the vegables and mix in the pasta.  You can add a bit more olive oil if needed, and be sure to reserve a bit of the pasta water and add that in as well. This was delicious!

Tuesday, April 10, 2012

Sasha's Kitchen: Passover Carrot Tzimmes Souffle


I made a delicious carrot tzimmes souffle tonight for Passover, after spending two great seders to start the holiday with my family in Philadelphia this weekend.  Passover, of course, is the holiday where you can't eat any bread or yeast for eight days.  I found this recipe in a Kosher cookbook at my parents' house the other day and decided to make it for Brad and I tonight for dinner upon our return to Brooklyn.  The mix of carrot and pineapple is just perfect.  You make the souffle with egg whites as usual, and matzo meal instead of flour, but the consistency is actually pretty similar to a typical savory souffle with the flavor of carrot tzimmes.  A real Passover treat!  This recipe is one I adapted from the cookbook Kosher By Design for the Holidays

Carrot Tzimmes Souffle
2 cups grated carrots (about five large carrots)
3/4 cup matzo meal
2 T orange juice
1 tsp lemon juice
1/2 tsp cinnamon (added by me to the recipe in the cookbook)
2/3 cup of granulated sugar (original recipe called for a cup, but I prefer to use a bit less)
5 eggs, separated
1/2 cup canola oil
1 20 oz can pineapple, pureed in a food processor


To make the souffle, preheat the oven to 350.  Separate the eggs.  Combine the yolks with the matzo meal, carrots, oil, lemon juice, orange juice, cinnamon and pineapple.  Set aside.  Beat the egg whites in a stand mixer using the whisk attachment until they are fluffy and have stiff beaks, beating on the highest speed for about three minutes.  Then fold the mixture of carrots and everything else into the egg whites with a spatula, and fold until fully combined.  Pour into a large souffle dish and bake at 350 for 45 minutes.  Enjoy immediately!